Some students never raise their hand in class. Not because they do not know the answer. They are just shy. Flipgrid fixes that problem.
Flipgrid is a free app for classrooms. The teacher asks a question. The student records a short video answer. That is basically it. No live pressure. No standing in front of the class. Just a camera and a question. We will show you how to use Flipgrid step by step.
What Is Flipgrid?
Flipgrid is a website and app made for schools. Teachers post questions. Students answer with a short video. Other students can watch those videos and reply with their own videos.
It works like a group chat but with videos instead of text messages.
It started in 2014. Teachers all over the world use it now. It works on phones, tablets and computers. Students do not even need their own account most of the time. They just use a code from their teacher.
Why Do Teachers Like It?
In a normal class only a few students talk. The quiet students stay quiet. With Flipgrid every student records a video. So every student gets a turn.
Students can also record their video many times before they send it. If they do not like how they sound they just record again. This helps students who are nervous or who are learning a new language.
Teachers can watch every student’s video. They can leave feedback. They can even reply with their own video. It feels more like a real conversation.
Step 1: Make a Teacher Account
Go to flipgrid.app on your phone or computer. Click “Sign Up.” You can use a Google account or a Microsoft school email. Both are free.
After you sign up you will see your dashboard. This is where everything happens.
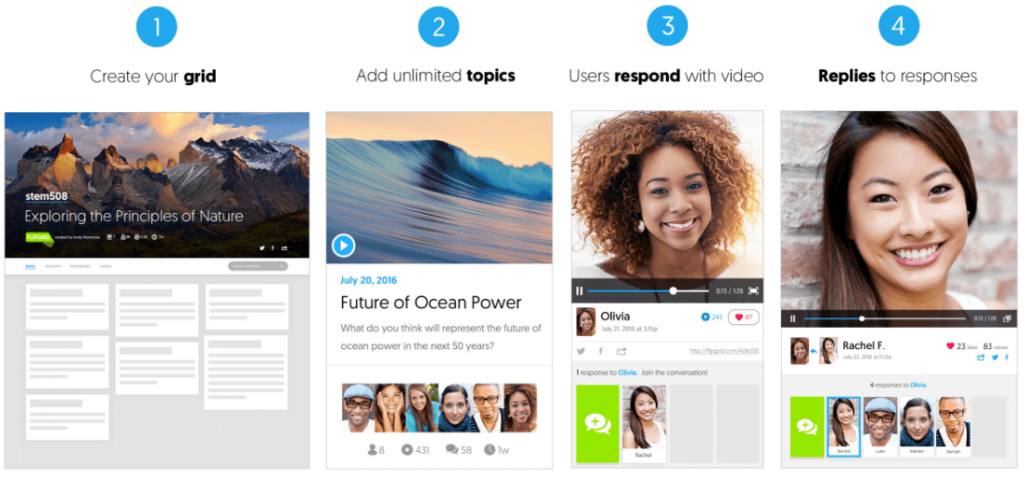
Step 2: Create a Grid
A Grid is your classroom on Flipgrid. Everything your students do will live inside a grid.
Click “New Group.” Type the name of your class. For example “Mr. Ali Math Class” or “Grade 6 English.”
Then pick the privacy setting. The safest option is “School Email.” This means only students with a school email can join. You can also add a password for extra safety.
You can add other teachers to help you. Flipgrid calls them “copilots.” A copilot can watch videos and post questions too.
You can also upload a fun banner image for your grid. Students like it when the page looks personal.
Grid States: Active, Frozen or Hidden
Your grid can be in three states.
Active means it is open. Students can see it and post videos.
Frozen means students can still watch old videos but they cannot post new ones.
Hidden means nobody can see it. Use this when you are still setting it up.
Step 3: Post a Topic
A Topic is your question or prompt for students. It lives inside your grid.
Click “New Topic.” Type a title. Then write your instructions. You can also record a short video of yourself explaining what you want. Most teachers do this because it shows students exactly what a good answer looks like.
Then set the video length. Students can record from 15 seconds to 5 full minutes. For younger students 1 minute is usually enough. For older students 3 to 5 minutes gives them more room to explain.
The Disco Library
You do not always have to write your own questions. Flipgrid has a big library of ready-made topics. It is called the Disco Library.
Search for your subject. Type “planets” or “book review” or “math problem.” You will find topics made by other teachers. Just click and add one to your grid. It saves a lot of time.
Step 4: Share the Code with Students
After you create your grid you get a Flip Code. It is a short code. Share this with your students.
Students go to flip.com or open the Flipgrid app. They type in the code. Then they type their name and they are in.
You can also copy a link and paste it in Google Classroom or Microsoft Teams. Students just click the link and go straight to your topic.
What Students Do Next
The student clicks on the topic. They read or watch your instructions. Then they click “Record a Response.”
The camera opens. Now they can start recording.
Fun Tools Students Can Use While Recording
Flipgrid gives students many tools to make their videos better.
Filters and frames change how the video looks. There are fun ones and simple ones. Shy students can pick a frame that covers part of their face. This helps if they do not want to fully show themselves on camera.
Stickers and emojis can be placed on the screen while talking. This is good for students who want to explain something visually.
The whiteboard tool lets students draw or write on the screen. This is great for math problems or diagrams. A student can write the steps while explaining them out loud.
Screen recording lets students show what is on their computer screen instead of their face. Good for showing a project or a document.
Students can also upload a video they made somewhere else. If they filmed something at home they can upload that file instead of recording live.
What Happens After Students Post
Once a student posts a video all the other students in the grid can watch it. They can reply with their own short video. This creates a real class discussion.
One student in one country can reply to a classmate in another country. Language students can hear how their classmates speak. Science students can share ideas. The conversation keeps going even after class ends.
Checking and Grading Videos
If you want to check videos before other students see them turn on Video Moderation. No video will appear until you approve it. This is a good idea for young students.
For grading Flipgrid has a built-in feedback tool. You can leave a written comment or record a video comment back to the student. You can also build a rubric and give a score inside the platform.
Flipgrid Shorts: Editing Videos Before Posting
Students who want to clean up their video can use Flipgrid Shorts. This is a simple editing tool inside the app.
Students can cut out parts they do not like. They can join two clips together. They can add stickers or text before posting. It is not a full video editor but it is enough to make a video look better.
Teachers can also use Shorts to make their own instruction videos.
Bringing Outside Guests Into Your Class
Flipgrid has a feature called Guest Mode. You can invite someone from outside the school to join a topic.
This could be a doctor talking to a health class. A writer talking to an English class. A parent who works in an interesting job. The guest records their video at a time that works for them. Students post their questions ahead of time. The guest answers those questions in their own video. Nobody has to be online at the same time.
Great for Language Learners
If your students are learning a new language Flipgrid is one of the best tools you can use.
Students can practice speaking without worrying about making mistakes in front of everyone live. They record at home. They listen to themselves. They record again if needed. They only post when they feel ready.
Teachers can also connect with classes in other countries. Students learning Spanish can talk to native Spanish speakers. Students learning English can talk to English-speaking classes. The practice becomes real instead of just textbook work.
Book Reviews with a QR Code
This is a creative idea some teachers use. Students record a book review on Flipgrid. The teacher prints a QR code and sticks it on the physical book in the classroom library. When another student picks up the book and scans the code they can watch the video review right away. It is like reading the back cover of a book but with a real student’s voice.
Good Habits to Start With
Record your own intro video first. When students see their teacher on camera it makes the whole thing feel less strange. It also shows them what a good video looks like.
Tell students to practice what they want to say before recording. Not a full script. Just a rough idea. Looking at the camera and speaking clearly are real skills. Flipgrid gives students a low-pressure way to build those skills over time.
For younger students go through the first recording together in class. Show them how to click record, play it back and submit. After doing it once most students feel comfortable on their own.
For Students Who Miss Class
Flipgrid is also good for students who are absent. They can watch the topic from home. They can record their response from home. They do not miss out on participating just because they were sick.
If a teacher recorded an instruction video using Flipgrid Shorts the absent student can watch it later at their own speed.
FAQs
Do students need an email to use Flipgrid?
Not always. If the teacher sets the grid to open access students just need the code and their name. If the teacher requires a school email login then yes a student email is needed.
Is Flipgrid free?
Yes. The main version is free. Teachers can create grids, post topics and let students record without paying anything. The free version is enough for most classrooms.
What devices work with Flipgrid?
Computers, tablets and phones all work. Flipgrid has an app for iPhone and Android. It also works in a web browser so students do not have to download anything.
Can students see each other’s videos?
Yes. That is one of the main points. Seeing classmates’ videos starts real discussion. But the teacher controls who can see what. If you want only the teacher to see the videos you can do that too.
What if a student does not want to show their face?
Flipgrid has tools for this. Students can use frames or stickers to cover their face. They can also do a screen recording so only their screen shows. Or they can upload a video of a poster or project instead of showing themselves.
Does Flipgrid connect with Google Classroom or Microsoft Teams?
Yes. Teachers paste the Flipgrid link into Google Classroom or Microsoft Teams. Students click the link and go straight to the topic. It works cleanly with both platforms.
Can parents watch their child’s videos?
It depends on what the teacher sets up. Teachers control all privacy. Some teachers share a view-only link with parents. Others keep videos inside the class only.
What age is Flipgrid for?
It is used from kindergarten all the way to university. The tools are simple enough for young children but flexible enough for adult learners. The teacher adjusts the topic and video length for the age group.
How long can a student’s video be?
The teacher decides this when setting up the topic. The options go from 15 seconds to 5 minutes. Students cannot go over the limit the teacher sets.
Can students use Flipgrid in any language?
Yes. There is no language requirement. Students can record in any language. Teachers can post questions in any language too. Flipgrid is used by classrooms all around the world.
Flipgrid feels a little new the first time. But once a student records their first video and sees a classmate reply something clicks. It stops feeling like an assignment and starts feeling like a real conversation. That is when the learning gets good.